While in the field there will be times when you will have to create or receive binder packages. These are the basic instructions on how to do so. First off, make sure you have a memory stick to put the binder on.
The first thing you have to do to create the binder package is have the binder open. Any workpapers you want to assign to the other staff member will have to be manually assigned form within the binder. Below are the instructions on doing that.
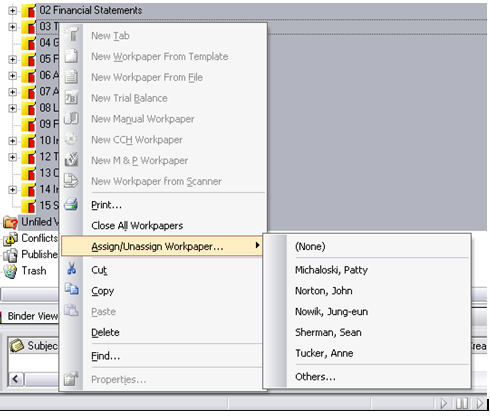
First highlight the tabs/files you want to give to another staff member. In the example below I highlighted all the tabs. Then right click and you will get a list of options, go to Assign/Unassign Workpaper and a list of your co-workers will appear. Pick the one you want (going to Others… for anyone not on the list).
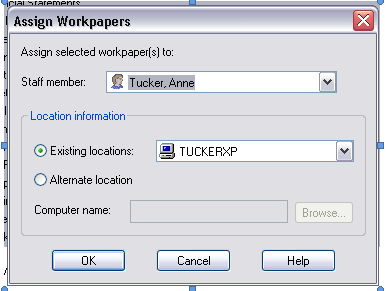
Once you pick a staff member, you want you have to make sure you assign it to the right computer. Some people will have multiple computers in the Location information drop-down in the Assign Workpapers window (see below). If someone is unsure of their computer’s name, they can right-click my computer and choose the Computer Name tab.
Once you have picked the staff member and the correct location, you can now close out of the binder.
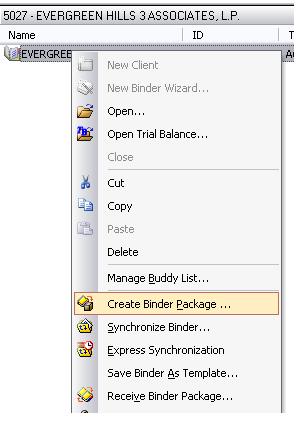
You will now right-click on the binder and choose the Create Binder Package… option almost half-way down (as shown in the illustration below).
The Create Binder Package window will open. You will have to go to the bottom where the File name: is located and pick Browse. (see Illustration on the next page (since it would not fit on this page))
Browse for the location of your memory stick.
(Note: your memory stick may not show up the first time you plug it in, if that is the case unplug it and plug it back in.)
Once you have set the file path to the memory stick, you can hit the OK button in the upper right. This will create the binder package. Wait for a completion message and for the light on the stick to stop blinking and you can them remove it and give it to your co-worker.

RECEIVING A BINDER PACKAGE
Now let’s pretend you’re the one who just got this stick with the binder package on it. All you have to do is plug it into your own USB port.
(the illustration above is to create the binder package; the ones below are for receiving…)
0 Comments